Inspired by the immensely talented
Bakerella, author of
Cake Pops: Tips, Tricks, and Recipes for More Than 40 Irresistible Mini Treats
, and her
Trick-or-Treat pops, I got it in my head to make pumpkin cake pops for Halloween. So, when Jo-Ann had Wilton Candy Melts on sale during their Moonlight Madness a week or so ago, I picked up a package in orange.
Even up through Halloween day though, I was sure whether I was going to try to make them. I returned to the
tutorial video from Complete Deelite on YouTube, which I'd watched a few months back, and checked out
Cakeb0t's how-to; both of which bolstered my confidence to try my hand at them.
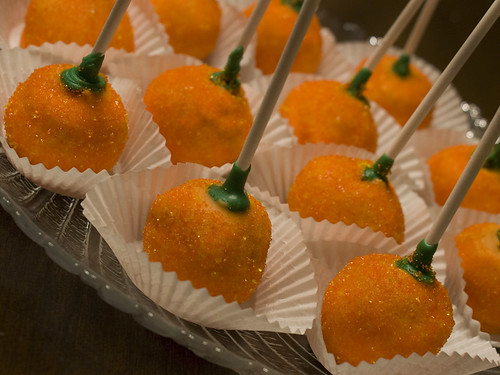
My intention was to use some bright orange sanding sugar I have in the pantry to make "sparkly" pumpkins rather than attempting faces my first time out to create Jack-'o-Lanterns. With an idea in mind, I decided to do a test. I tried using regular food coloring to dye the paper lollipop sticks green. In the end, while I like the idea that the stick is the stem, I didn't like the look of the green food coloring and was concerned it would stain the recipient.
Still determined to use the stick as a stem, I used green candy melts to attach the sticks to balls of cake, leaving a little sticking out (as it were) to look like a cut pumpkin stem. This switch up also meant that I didn't need to procure a piece of Styrofoam for drying/chilling the pops and that we could easily transport them to our offices to share with colleagues, if we choose.
The process started by baking a batch of pumpkin spice cupcakes, using a Duncan Hines spice cake mix as a base, and adding my own pumpkin along with egg beaters. Once cooled, I began by crumbling six cupcakes into a large glass bowl, as Complete Deelite's video suggested. Although I was conservative with the frosting, I found I needed an extra cupcake for balancing the texture. Eight cupcakes yielded 20 pops, so I would return again to my cooling rack for two more cupcakes to ensure I would have at least 24 finished cake pops, and maybe one or two for quality control testing.
Coating them in the candy melts and sprinkling with colored sanding sugar was the most cumbersome task, even without making them as schmancy as the aforementioned creations by
Bakerella.
 And what did we learn this week?
 To begin with, cake pops are a bit time consuming.
Sticks: Only stick it once. I reset a few of the sticks, which left gaps and two slipped nearly off the stick while rolling them in the candy melts.
Chilling: Getting and keeping them nice and cool is important--especially when applying the coating. I chilled mine in the freezer because it has more space than my refrigerator. The next time I try this, I will take them out of the freezer in small batches rather than removing the entire tray of 24. Twice I had to pop them back in to the freezer because they were softening, making them difficult to dip.
Sprinkling Sugar: I decided to use Deelite's method for applying the sugar (she used sprinkles). It worked fabulously; I'll definitely have to use that technique when making my chocolate covered pretzels with crushed candy canes at Christmas.

The final result of all these efforts is reasonably cute. My colleagues loved them--both look and taste. I was more put-off by the texture than I expected. Even though I could tell they are meant to be more like a truffle consistency, I missed my soft, fluffy cupcake texture.
Cake pops would be like an excellent way to "recycle" cake or cupcakes that, for whatever reason, are too crumbling to frost in a traditional way or for the "leavings" from leveling a layer cake.
Still working on a clever closer. For now...hasta la feasta, baby!
p.s. Sorry! I've misplaced my camera card with the "in process" images on it.


